Hp Stream 14 Stuck on Black Screen Nonremoveable Battery
Z7_3054ICK0KGTE30AQO5O3KA30N0
hp-concentra-wrapper-portlet
![]() Actions
Actions
HP Notebook PCs - Troubleshooting Black Screen Displays with No Error Messages During Startup or Boot
Startup Symptom: LEDs glow, but computer fails to startup or boot, and displays a black screen
| Use this document if the LEDs glow to indicate that power is available and the sound of a fan or spinning hard drive can be heard, but no colors, images, or text are displayed on the LCD display. | Do not use this document if there are no sounds from the computer when the power is turned on. You should check for a different problem; such as a loose RAM memory chip or disconnected hard drive. |
The cause of this problem may be the failure of a hardware component, or an error in the instruction being sent from the BIOS to a hardware component.
Before you begin troubleshooting your computer
Before you begin troubleshooting your computer, perform the following steps:
Step one: Perform a hard reset
If your computer suddenly fails to boot properly, you should perform a hard reset.
-
Disconnect all peripheral devices and remove all USB devices and media cards. You want to test the computer not the accessories!
-
Disconnect the AC power adapter, remove the battery, and then press and hold the power button for at least 15 seconds.
-
Reconnect the AC power adapter (but do not connect the battery), Press the Power button, Look for glowing LEDs near caps lock and num lock keys, and Listen for sounds of a disk drive and fan turning.
If the display remains blank (black screen or white screen) after doing a hard reset, temporarily connect an external monitor to test the notebook's display. If an image displays on the external monitor, continue to perform the tests, install drivers, and make adjustments as described in the next section.
Step two: Connect an external monitor to test the display
The notebook's screen display may remain black when there is a corrupted graphics driver, or a problem with the LCD display's back light. You can test the display by attaching an external monitor and restarting the computer. Testing with an external display is helpful if the notebook display is black but you can hear sounds; such as fans, spinning drives, or beep tones which indicate that the computer is operating. If you can hear sounds of operation but no image is visible on either display, contact an authorized repair center.
-
If there are no sounds from the computer when the power is turned on, check for a different problem; such as a loose RAM memory chip or disconnected hard drive.
-
If you are having trouble viewing the external monitor, click f4 (or the key with this symbol
 ) to switch the screen image among display devices connected to the system. For example, if a monitor is connected to the computer, pressing this key alternates the screen image from computer display to monitor display to simultaneous display on both the computer and the monitor.
 -
If an image displays on the external monitor, there may be a graphics driver conflict with the notebook's LCD display. With the external monitor connected, download and install the latest drivers for your specific computer and graphic chip set.
-
If you do not have an external monitor, it may be possible to see an image by switching the LCD display to a low resolution mode. To change the resolution, turn on the computer, and press the f8 key. If the graphic display is working at the BIOS level, a text screen displays and you can select the Enable low-resolution video option. If the graphics display is not working at the BIOS level, contact an authorized repair center.
As a final action, if there is an image on the external monitor and you have installed the latest BIOS, updated CPU chips set, and updated graphics drivers but the notebook display remains black, the LCD may be defective. It may be necessary to contact HP for technical assistance or send the notebook for service to replace the display.
Step three: Disconnect all peripherals and repeat the hard reset
Even when instructed to disconnect all peripheral devices from the notebook before doing a hard reset, some devices are often overlooked.
Double-check that all devices are disconnected including: external keyboard and mouse (wired or wireless), USB connected external drives and devices, thumb drives and flash drives, network storage devices, PC card, SD memory cards, express card, eSata connections, firewire or similar devices, printer, scanner, camera, port replicator, or docking station, any CD/DVD from the optical disc drive, and any media from the multi-card reader.

Proceed to the Test for memory module problems section.
Test for memory module problems
When you try to turn on a computer, one of the first hardware tests performed is the memory check. If the start up test cannot access the memory chips, the testing stops and no additional actions can be taken. In other words, when you press the power button the LEDs may glow for a moment and a fan may start to spin, but then all action stops.
This problem must be resolved before you can boot into the BIOS or Windows and perform any other tests.
Some HP Notebook PCs come with two sticks of memory and have two memory slots. If you experience a black screen error, the problem could be with one of the sticks of memory or with one of the memory slots, or one of the sticks may not be seated properly in the slot.
The memory module compartment on most notebooks is located on the bottom of the case. The exact position varies by model. However, on some models, the memory compartment is under the keyboard. See your User Guide for the exact location of memory modules on your notebook.
Test for memory problems using the memory self test
If the computer can access part of the memory, it may be possible to access the BIOS Setup Utility display and perform a memory self test to identify other memory issues. If the computer cannot boot to the BIOS Utility, try removing and reseating the memory and the hard drive, and then repeat the following steps to perform the memory self test.
-
Plug the AC adapter into the computer.
-
Turn off the computer and wait 5 seconds.
-
Press the Power button to start the computer and repeatedly press the f10 key to enter the BIOS Setup menu.
-
In the BIOS Setup Utility, use the Right Arrow or Left Arrow keys to navigate through the menu selection to locate the Diagnostics.
-
Use the Up Arrow or Down Arrow keys to select Memory Test.
-
Press Enter, then Yes to perform memory test.
-
After test completes, press f10 to Save and Exit, then press Enter to Exit Saving Changes.
If the test fails, one or more of the memory modules may not be seated properly. Check for and reseat loose memory modules.
Check for loose memory modules
Normally, a computer will not display an image if a memory module is loose. However, in some cases, if a memory module is loose or is not making good contact with the memory slots, the computer may responds but does not recognize all of the memory. Reseating the memory module may resolve memory failure errors. To reseat the memory module, take the memory module out of the memory slot and then put it back into the slot to get a better connection so that the computer can recognize the memory.
The memory module compartment on most notebooks is located on the bottom of the case, however, on some models, the memory compartment is under the keyboard. See your User Guide for the exact location of memory modules on your notebook.
Use the following steps to remove and reseat the memory modules:
-
Step 1 - Remove the electrical power
To remove all power from the computer and prevent accidental damage to the electronic components, do the following:
-
Turn off the computer by pressing and holding down the Power button for about 30 seconds.
-
Unplug the AC adaptor from the notebook.
-
Slide and hold the battery release latch to the unlock position.
-
Use your finger to lift the battery up and out.
-
-
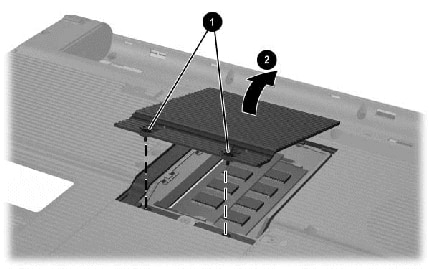
Step 2 - Remove the memory module
-
Remove the memory module cover on the bottom of the notebook.
-
Loosen the compartment's retention screws
-
Lift up and remove the memory compartment cover
Figure : Removing the memory module cover
-
-
Remove the memory modules from the memory slots.
-
Pull the retention clips away from sides of the memory module
-
Gently pull the module out of the memory module slot
Figure : Removing the memory modules

caution:
To prevent damage to the memory module, grasp the memory module by the side edges. Do not touch the metal contacts.
-
-
Reseat the memory module by holding module at a 45-degree angle, and pressing it firmly into the memory slot until it is seated.
-
Align the notched edge of the module with the tab in the slot.
-
Firmly press the module into the slot.
-
Pivot top edge of memory module downward until retention clips snap into place.
Figure : Reseating the memory module

-
-
After reseating the memory module, replace the cover over the memory compartment before restarting the computer.
-
Align the cover tabs
-
Tighten the memory compartment cover screws
Figure : Replacing the compartment cover

-
-
-
Step 3 - Replace the electrical power
When troubleshooting problems, use only the AC power to perform the tests. After the problem is resolved, you can turn off the computer and insert the battery into the notebook.
-
Plus the connection from the AC adapter into the notebook, and then connect the AC adapter to a working power supply.
-
Perform any tests to verify the computer can startup and run in the Windows operating system.
-
With the computer turned off, push the battery into the base enclosure until the retention clips click into position.
-
If the computer fails to boot to the Windows desktop after the memory is reseated and the battery is installed, contact HP for support.
Test two memory modules
Only one memory module is required for the computer to operate. If two memory modules are installed, each memory module should be tested in the computer independently of the other.
To test the memory modules, follow the steps below:
-
With the AC adapter and battery disconnected, remove all the memory modules, and then insert one memory module in the first slot.
-
Connect the AC adapter and turn on the notebook. If the computer starts up normally, the memory modules function correctly.
-
Remove the AC adapter and turn off the notebook. Then repeat the same procedure for the second module.
-
If the computer starts normally, then both memory modules are good.
After the memory is reseated, connect the AC adapter and turn on the notebook.
-
If the computer starts up normally to the Windows desktop, no further action is needed.
-
However, if the computer still stops at the black screen continue by testing the memory slots.
Test two memory slots
If a memory module does not work in both the slots, to test the individual memory slots, follow the steps below:
-
After testing the memory modules as described above, insert one module in the second slot, connect the AC adapter and turn on the notebook.
If the computer starts up normally, the memory slot functions correctly.
-
Remove the AC adapter and turn off the notebook. Then repeat the same procedure for the second slot.
If the computer starts up normally, you have verified that both memory modules and memory slots function correctly.
After the memory is reseated, replace the memory compartment cover, connect the AC adapter and turn on the notebook.
If you do not feel comfortable reseating the memory yourself, take the computer to a computer retailer and ask them to reseat it for you.
Test for memory problems using HP PC Hardware Diagnostics
The Memory Tests include a Fast Test, Quick Test, and an Extensive Test. If you think there is a problem with the memory, first try the Fast Test (3 to 5 minutes). If the Fast Test does not find a problem, run the Quick Test (about 10 minutes). If the Quick Test does not find a problem, run the Extensive Test (about 45 minutes) which also has a Loop Until Error option.
Follow these steps to run the Fast Test:
-
Hold the power button for at least five seconds to turn off the computer.
-
Turn on the computer and immediately press Esc repeatedly, about once every second. When the menu appears, press the F2 key.
-
On the main menu, click Component Tests.
Figure : Selecting Component Tests from the main menu

-
The Component Tests menu displays. On the Component Tests menu, click Memory.
Your Component Tests menu might be different, depending on the components installed on your computer.
Figure : Selecting Memory from the Component Tests menu

-
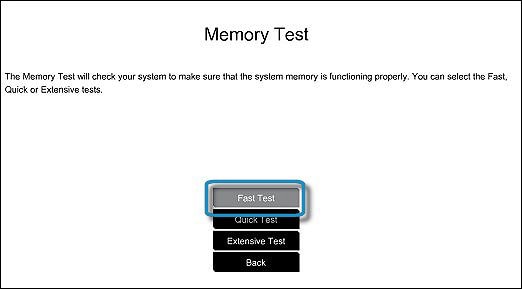
In the Memory Test menu, click Fast Test.
Figure : Running the Fast Test
-
Click Run once. The Fast Test begins.
-
When the Fast Test is complete, the results are displayed on the screen.
If the memory passes the Fast Test but there is still a problem with the computer memory, run the Quick Test.
If the memory passes the Quick Test but there is still a problem with the computer memory, run the Extensive Test. This test can take 45 minutes or longer.
If the memory fails one of the tests, write down the failure ID (24-digit code) so you have it available when you contact HP Customer Support. The information is also available in Test Logs on the main menu.
Test for hard drive problems
Test for hard drive problems using the hard drive self test
When you try to turn on a computer, one of the preliminary hardware tests performed is the hard drive connection check. If the start up test cannot access the hard drive, the testing stops and no additional actions can be taken. In other words, when you press the power button the LEDs may glow for a moment and a fan may start to spin, but then all action stops. Removing and reseating the hard drive can restore the connection and allow you to continue the start up testing and perform other hard drive tests.
note:This problem must be resolved before you can boot into the BIOS or Windows and perform any other tests.
Many computer problems are related to soft failures (or degraded performance) on the hard drive. The HP Hard Drive Self Test will repair soft errors on the hard drive, but it will not report the errors. After the test is complete, restart the computer to see if test repaired the problem you may been experiencing.
Use the steps below to test the hard drive in a computer using the HP Hard Drive Self Test.
-
Plug the AC Adapter into the computer.
-
Turn off the computer and wait 5 seconds.
-
Press the Power button to start the computer and repeatedly press the f10 key to enter the BIOS Setup Menu.
-
Use the Left Arrow or Right Arrow keys to navigate through the menu selection to locate the Primary Hard Drive Self Test option. Depending on your BIOS, this may be located below either Diagnostics or Tools.
-
Select Primary Hard Drive Self Test, and press the Enter key to start the test.
note:
The exact wording for your particular BIOS may be slightly different.
The Hard Drive Self Test performs a Quick Test followed by a Comprehensive Test. During each test, the window displays a status bar and an estimated time to completion. See Testing a Hard Disk using the Built in Self Test for additional information.
-
If any test fails, contact HP service and support for instructions on how to order a replacement hard drive.
-
If all of the tests pass, the hard drive is not damaged. As a rule, HP will not replace a hard drive under warranty that does not fail the HP Hard Drive Self Test.
Test for hard drive problems using HP PC Hardware Diagnostics
There are six hard drive tests. If you think there is a problem with the hard drive, first try the Quick Test (2 to 3 minutes). If the Quick Test does not find a problem, run the Extensive Test (2 hours or more) which also has a Loop Until Error option.
Follow these steps to run the Hard Drive Quick Test:
-
Hold the power button for at least five seconds to turn off the computer.
-
Turn on the computer and immediately press Esc repeatedly, about once every second. When the menu appears, press the F2 key.
-
On the main menu, click Component Tests.
Figure : Selecting Component Tests from the main menu

-
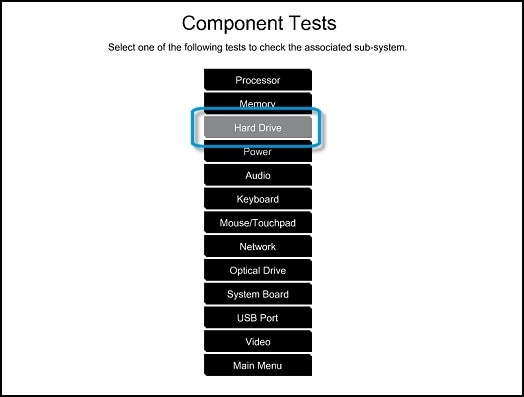
In the Component Tests menu, click Hard Drive,
Figure : Sample list of Component Tests
-
In the Hard Drive Tests menu, click Quick Test.
Figure : Selecting the Hard Drive Quick Test

-
Click Run Once.
Figure : Running the Hard Drive Quick Test

-
The Hard Drive Quick Test begins. If the computer has more than one hard drive, select the drive you want to test. To test all the hard drives, select Test All Hard Drives.
When the test is complete, the results are displayed on the screen. Test results are also available in the Test Logs on the main menu.
-
If the hard drive passes the Quick Test, but there is still a problem with the hard drive, run the Extensive Test. This test includes the SMART Check, Short DST, Optimized DST, and Long DST. To run these tests individually, select them from the Hard Drive Tests menu.
If the hard drive fails one of the tests, write down the failure ID (24-digit code) so you have it available when you contact HP Customer Support. The information is also available in Test Logs on the main menu.
What to do when the computer starts into Windows normally
After you have completed the troubleshooting process and your computer has booted normally into the Windows operating system, you should:
-
Run HP Assistant to update HP software and drivers.
-
Run Windows Update to update operating system and software.
-
Run anti-virus program to remove any virus.
Hp Stream 14 Stuck on Black Screen Nonremoveable Battery
Source: https://support.hp.com/id-en/document/c01997899
0 Response to "Hp Stream 14 Stuck on Black Screen Nonremoveable Battery"
Post a Comment